Tag Archives: object schedules

The Often Neglected Basic Shapes

I think the Basic Shapes often get ignored. These library parts are great as place holders or substitutes for tedious to model objects, basic element massing, or even final model elements. The grid object is great for register and vent grills and grates, drain screens, ceiling grids, trellis elements and more. Some of the other shapes can be used as object massing, or even a starting place for generating custom objects. Creating curved elements directly with the morph tool is possible, but they typically turn out blocky and faceted looking. Starting with a Cylinder, Cone or Sphere allows you to set the resolution of the curves, then convert to a morph to edit or incorporate with other morph elements.

screen-shot-2016-10-25-at-10-31-24-am

Some of the objects in this folder may be useless and tacky (the House Model & Conceptual Tree Model for example), but most of these elements can be a dynamic part of modeling complex model elements or even schedule-able place holders for elements that we may not see in the model; such as hidden appliances and plumbing accessories. I recently used a few of these elements to model an exposed sink trap for a bathroom, and it was much faster than trying to build it with beams and columns or morph elements.

The last thing to consider is that these objects often have settings beyond the obvious. Some have settings for adjusting number of faces, curve resolution, overall and individual dimensions. This allows a polygon prism object to accomplish a wide range of geometries, for massing elements as well as trimming elements as a dedicated operator.

Just keep this little library folder in mind next time you are considering building a new custom object, fixture or accessory.

Schedule Criteria

We have looked at why doors and windows may not appear in an ARCHICAD schedule, or why they may not appear in their related zone before. Here is the link to that post, which is worth re-reading as a refresher.

The past couple weeks I have been getting more scheduling questions; more related to eliminating certain elements from a schedule, or why unexpected elements are showing up in a schedule. The answer is almost always due to an error in the Schedule Criteria Settings. Here we will look at a few scenarios that may cause undesired results with your schedules, all linked to incorrect criteria.

screen-shot-2016-09-19-at-1-40-59-pm

Fig. 1.0 Incorrect use of “and”Statements

In Figure 1.0 above, the Element ID that can be listed is using an and statement, rather than or. The result is, no elements will schedule, since it is impossible for any elements to meet the criteria of start with 0 and 1 and 2 and 3. We often list multiple element ID in our schedule as a first digit as an easy way to seperate schedules out by building or by floor for multiple building projects. To fix this, the Element ID Criteria should be bracketed, and each ID starts with line should end in or.

screen-shot-2016-09-19-at-1-41-11-pm

Fig. 1.1 Unbracketed “or” Statements

In Figure 1.1, the ID starts with lines are correctly ending with an or statement to continue to the next criteria line; but they are not bracketed. The result will be windows that start with 0, or ANY ELEMENT that starts with 1, 2 or 3 will show in the schedule. To correct this issue, simply add a bracket before and after the or statements.

screen-shot-2016-09-19-at-1-41-22-pm

Fig. 1.2 Incomplete Bracketing of “or” Statements

The last example, Figure 1.2, shows a partially bracketed “or” section of the Criteria. By not closing the bracket, you will see a warning in the Scheme Settings noting that the Criteria is Invalid! The result will be nothing can schedule until the brackets have been correctly applied.

Hopefully this gives a little more insight into what may be going on with your schedules, and why things are missing, or too many elements are being included.

Latest Schedule Information

For anyone working on a project started after the release of Template 18.2, we have a new system for scheduling non-door & window objects. Rather than using independent schedule tags, which are duplicates of most of the model elements they represent, I have mapped an IFC system to match the previous naming and identification system.

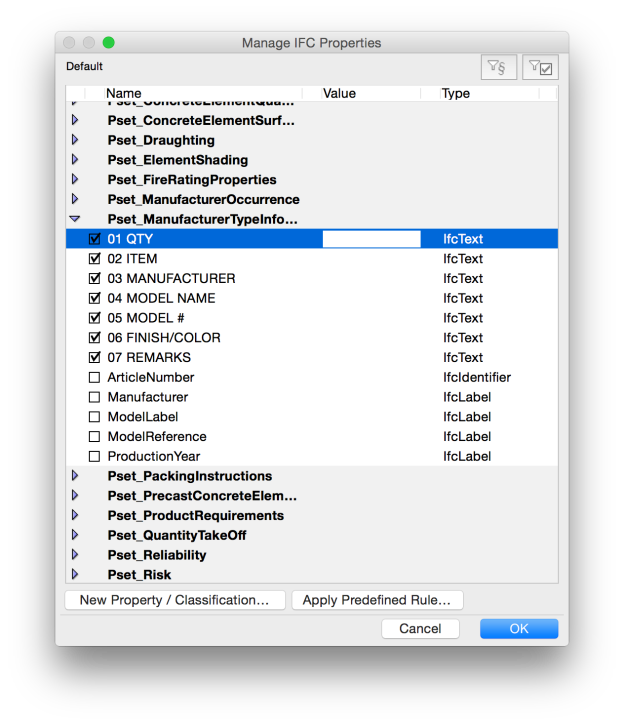
The advantage to this is that any object can be scheduled together, requiring fewer (or no) tag elements to create a schedule. The section you want to look for in the element selection settings is at the bottom of the settings window under Tags and Categories > IFC Properties, and should look something like the window below:

Screen Shot 2015-06-29 at 4.41.53 PM

The 01 QTY, 02 ITEM… fields replace the tag settings for all objects, including the tags (in case they are still needed for some hardware elements or surfaces).

If the IFC Properties field does not match what is shown above, it is simple to bring them up for any object. These 7 fields have been mapped for all object types in the latest template version. Just click on the Manage IFC Properties… button at the bottom to bring up a window like this:

Screen Shot 2015-06-29 at 4.31.08 PM

Screen Shot 2015-06-29 at 4.40.11 PM

Open the Pset_ManufacturerTypeInfo… section and check boxes 01-07 and click OK.

Next check the specific schedule settings you want any element to be listed under. In the Criteria section look for the Name (Attribute) starts with line. For plumbing fixtures, the abbreviation is PF. This field is up in all IFC settings, and if you notice in the first image I have called the toilet under its IFC parameters to be called out as PF-TOILET 1. Now any additional fields filled out in items 1-7 added to the IFC settings list will populate the schedule:

Screen Shot 2015-06-29 at 4.47.42 PM

I will admit, this does potentially require an additional step (until I get the favorites updated to include these settings), but it does mean that literally anything can be scheduled together. Quite literally, it is possible to schedule a column, slab, wall, etc. element with the plumbing fixtures, hardware, etc.

If this is a little confusing at first, let me know when you get into scheduling, I can do small group or even one-on-one desk sessions to clarify. I think ultimately this will make scheduling a lot more flexible and easier to manage.


ADDITIONAL SCHEDULE CATEGORIES

Recently we were looking for parameters for a door schedule, but could not find them in the standard schedule scheme settings. If this happens they most likely will be located in the additional object parameters or the additional IFC properties.

Screen Shot 2014-09-29 at 8.58.58 AM

In the schedule Scheme Settings, click the down arrow to the right of the “Add” button (bottom left corner of the dialog box. This will give you a search box for the above mentioned additional parameters/properties. Virtually anything in an objects selection settings and IFC settings can be scheduled, you just need to find the object within the additional object parameters menu.

Screen Shot 2014-09-29 at 8.59.07 AM

A quick way to find these objects is to be sure to save the object as a favorite, or to use the appropriate favorites from the start. By using the favorites and having the correct favorites palette loaded you will be able to search for specific objects by the favorites list. Once you have the object selected it is a simple task to search through the schedule-able fields and find the category you want to add. If it shows up in an objects selection settings dialog box it should show up in the favorites Additional Object Parameters dialog box.

The parameters we were searching for were the “User Defined” elements of a Cadimage door. Using these, rather than the default “Custom Text”, we were able to have custom fields that tied directly to the door object rather than a global Custom Text. These User Defined list items were located in the favorites list under the Cadimage Door object.Screen Shot 2014-09-29 at 10.54.44 AM