Category Archives: Rendering

Twinmotion Frozen?

I know this has come up in the TM lunch and learns we have done at least once, and Matt explained it to me in person, but until I actually experienced it, the “freeze up” didn’t really make sense.

I was working on a TM rendering yesterday and most of the functions and navigation seemed to be frozen. The issue was related to adjusting surface color. The Color picker palette can become hidden behind the TM application window if you click on the model before closing the color picker.

Screen Shot 2019-05-02 at 2.19.08 PM.png

To fix the problem, just drag the TM application to the side or expose the color picker palette and close.

Once again, this is not a “computer freeze up” or even an application bug. If you have no mouse or keyboard response and can not switch apps or navigate basic menus in Twinmotion, that is another issue all together. This freeze up issue is indicated by limited menu access and navigation control.

Multiple Files & Attribute Matching

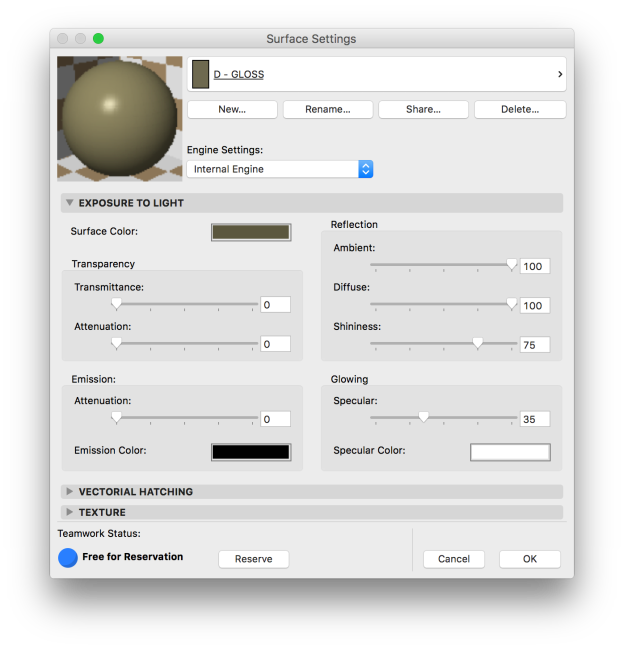
Attribute management between files for a single project is critical. If attribute numbers do not match from a building file to a site file, or between multiple building files of a single project, the Hotlink Modules will not appear correct. Surfaces of a module may show incorrectly, or be missing, custom profile beams/columns/walls can become reassigned to a new shape, and composites can switch to a different width if not properly matched.

It is important to note, the attribute number is how attributes are assigned to elements. For example, if your building file has attribute #10 as a stone, but the site file has attribute #10 as a wood, the buildings file will show correctly as stone, but when the building is saved to a .mod and placed to the site, all stone will switch to wood. If attribute #10 doesn’t exist in the site file, the stone will show as a purple & black checkered pattern, indicating the surface is missing.

Attribute Matching

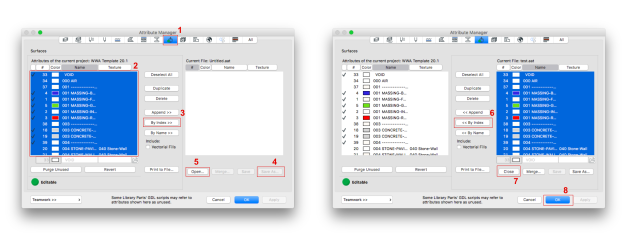
To prevent these errors we have introduced an Attributes file into our workflow for each multi-file project. All attributes (Fills, Line Types, Composites, Custom Profiles, and especially Surfaces) will be generated in this central Attributes teamwork file, then using the Attribute Manager will be matched to all other files for that project on the BIM Server. This does mean a little more management up front, and involves a couple extra steps in managing the project. But the results are a lot less headache on the back end when publishing BIMx, or linking Views from a Site File to the Layout Book of the Buildings File. This is especially critical where projects get so large they require multiple building files, or even multiple site files; which is becoming increasingly commonplace.

Please note, the use of a dedicated Attributes file is not an option or choice to be used (or not) by each team. This is the standard we are using to manage attributes between files at WWA, and a dedicated attribute file has been created in your BIM Server folder if your project program requires one. A little extra time to do this right will ensure we do not need to stop and do things over when our BIMx, PDF and DWG files don’t show correctly due to poor attribute management.

Please watch for an update to our BIM Manual for instructions on how to properly use the dedicated Attribute file.

New Surface from Internal Settings

Getting a surface image or color to render out properly can be difficult due to the number of variables that need to be managed. I have gone through a basic exercise to explore 4 different surface settings for reflection to compare results on surface color in Open GL and CineRender views. The surfaces I generated are a basic medium gray and a bone white surface with varied reflection and emission settings.

For the purposes of this exercise, I have eliminated all Transparency and Emission variables, and only made adjustments to the Reflection and Glowing Settings. By playing with the Specular Color, you can further adjust the hue of the CineRender view.

screen-shot-2016-11-11-at-11-29-53-am

Matte Settings

screen-shot-2016-11-11-at-11-29-57-am

Semi-Gloss Settings

screen-shot-2016-11-11-at-11-30-02-am

High Gloss Settings

screen-shot-2016-11-11-at-11-30-06-am

Mirror Settings

Note that the final color of the rendered view is impacted to varying degrees based on the reflection settings. Further adjustments can also impact the color, intensity, reflectivity of the surfaces include: Lamp Settings and location and hue, Rendering Engine preset, Rendering Sky Preset, and Surface Color.

open-gl-3d-window

Open GL View

outdoor-with-lamps

CineRender Outdoor Daylight Medium + Lamps 50%

Rendering Post Production

Photoshop is an essential part of Architectural visualization and BIM. Wether it is creating surfaces to map out over the BIM model elements or fine tuning presentation images, we need photo editing tools.

Using out of the box ARCHICAD default renderings settings is often sufficient for producing quick images or lighting studies, but to create stylized visuals populated with believable people, plants and other entourage imagery it is essential to utilize post production techniques.

In the upcoming February lunch and learn we will be presenting photoshop techniques to bring in content and create a cohesive image with background photos and plant/people cutout images.

Here are the before and after samples from two projects that will be presented. These images have been produced by Amadeo & Darcy:

Before

Project 1 Before (Amadeo)

After

Project 1 After (Amadeo)

DIAMOND HEAD RESIDENCE

Project 2 Before (Darcy)

DIAMOND HEAD RESIDENCE

Project 2 After (Darcy)

Another Rendering Example

Maggie has been doing some pretty incredible renderings for her project, as I mentioned (and she demonstrated) in the last staff meeting. Just to showcase some of those, and give a comparison of how you can take your renderings to a new level of awesomeness, here are her updated images!

The “improved” version of these images started as the CineRender Indoor Daylight Medium Physical preset with a few minor adjustments, like turning lamps on. None of these images uses any photoshop post rendering adjustment.

Default CineRender Indoor Daylight Fast Rendering:

01 1BR Common Room

Updated objects, new surfaces, lamp elements & adjusted rendering settings:

1BR Cottage common room

Default CineRender Indoor Daylight Fast Rendering:

Barn Bunkhouse 01

Updated objects, new surfaces, lamp elements & adjusted rendering settings:
Barn bunkroom entry

Default CineRender Indoor Daylight Fast Rendering:

Barn Bunkhouse 02

Updated objects, new surfaces, lamp elements & adjusted rendering settings:

Barn bunkroom bed elevation

Just a little attention to detail, the right objects and leveraging the lamp tool makes a huge difference!

Sun Study Time Stamp

Need to add a time stamp to a sun study or other ArchiCAD produced rendering? With the standard quick time player it is as simple as turning on the subtitles. A quicktime file produced from ArchiCAD’s 3d window will automatically place the location, date & time in the subtitles.

First, verify you are saving as a quicktime (and not MP4) format.Screen Shot 2015-05-04 at 3.57.10 PMNext open the movie in quicktime and turn on subtitles. Auto, although recommended, does not work.Screen Shot 2015-05-04 at 12.56.34 PMThe result is a subtitle bar with location, date & time.Screen Shot 2015-05-04 at 12.56.42 PM

Another Rendering Example

Afra has recently done a couple of section cut renderings to illustrate two options for an art wall for the Pacific remodel. The cut fill set as orange is set by the Filter & Cut Elements in 3D options under the View  > Elements in 3D View menu. The renderings were then produced using the Cinerender Engine and a little photoshop. Here is Afra’s description:

“The two options I’ve prepared for the client are attached. They emailed us this morning to let us know they’re thinking about buying a rather large painting and currently debating where it could be located in their new house. They asked us to produce a couple of elevation studies ASAP to help them make their decision. 
They sent us a jpg of the painting, so these images are just a combination of rendering, outlines, and a little bit of photoshop. Overall, pretty simple!”

painting-option-east-wall painting-option-west-wall

RENDERING & PS POST RENDERING QUICK TIPS

JKR boathouse_full size

Phil has recently produced some amazing renderings for the a boathouse project. He has used Amadeo’s renderings as his targeted “style” for these renderings. Phil’s recommendation for creating and managing these images is to create a clear layer structure in your PS file. Much like you should be using clear layer standards and navigator organization in your AC files, you should have a clear and consistent layer structure for your PS post rendering work. This will make it easier to have a consistent style between multiple renderings as well as make it easier to update the rendering to match any future model changes.

Here is a quick screen shot of Phil’s PS layer organization as a reference:

JKR boathouse PS layers