Tag Archives: Work Environment

Tracker & Working Units

Recently we have seen inconsistent levels of precision between different work stations. One computer, using the Measure Tool, will show a wall at 10′, another will show it at 10′-0 1/64″ (for example). After a little testing and digging around, we found that Working Units, unlike Dimension Styles and Calculation Units & Rules, are not project specific. However, just like Dimension Styles, Working Units should be set to the highest level of precision possible; that is to the nearest 1/64″.

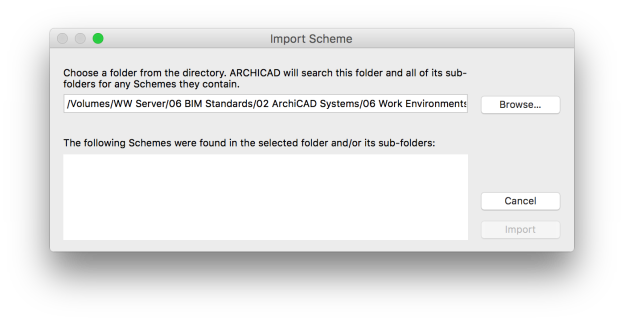
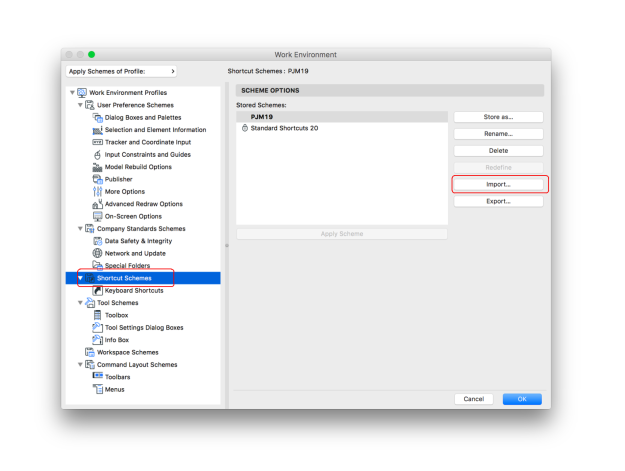
To check and modify your working units, go to the ARCHICAD menu > Project Preferences > Working Units.

02 Working Units.png

Model Units Need to be Set to 1/64

If Model Units are set to anything other than 1/64″, there is a high likelihood of dimensions not reflecting intended design dimensions.

04 Tracker Off.png

Dimensioned Length Shows 120 1/64″,  Measured Length Shows 120″

Beyond the input precision; be sure you are using actual tracker input, rather than just clicking when the tracker shows the desired length. You can tab through the tracker options with the “tab” key, or direct input short cuts are:

  • ‘r’ = Distance (radial distance)
  • ‘a’ = angle
  • ‘x’ = x distance
  • ‘y’ = y distance
  • ‘z’ = z distance

Use the Shift key before the input to lock direction/angle. It should be second nature at this point to type Shift + R before putting in a distance. You can adjust your work environment to give higher levels of angle. I recommend setting it to every 15º, then use the angle input in the tracker for any angle at smaller increments.

05 Tracker Angle W_E.png

Work Environment Input Constraints, Set to 15º


Info Box Content

The Info Box is an instrumental palette to the ARCHICAD work environment. There is content in the Info Box that is difficult, if not impossible to adjust anywhere else. A large function of this palette is to give an easy access to each element’s Selection Settings. There are, however, a few items in the Info Box that are not available in the Settings Dialogue. These are the Geometry and Construction Method settings. A handful of element types have these incorporated into the settings dialogue, such as the Geometry Method for the Shell Tool. The Shell Tool has an additional Construction Method that is only available in the Info Box.

The Info Box for all available tools with Palette only content:

The geometry method is useful for a wide range of functions. Wether it is drawing 4 walls with a simply x/y input, setting a shell to rotate a given shape rather than just a dome or arc, or setting your labels to place more precisely with a three point click instead of a simple click and drop in place; the Geometry and Construction method settings only available in the Info Box will help model more quickly and precisely.

Importing Work Environments/Shortcuts

As discussed in our last Lunch and Learn, it is best to rebuild your tool and palette schemes rather than bringing in an old Work Environment to AC20. Whenever you migrate an old W/E into a new version of AC, you run the risk of missing or locking yourself out of new features, or even relocated old features.

It is generally safe to bring in old keyboard shortcut schemes, but it is also a good time to evaluate what keyboard shortcuts you actually use. So here are 2 tips for keyboard shortcuts in your work environment.

  1. To check what your shortcuts are and evaluate wether you actually use them, go to your work environment and go to the Keyboard Shortcut Schemes section. In the bottom right corner of this W/E tab, you will see a button to show all shortcuts in a browser window. This can then be saved as a PDF or printed out for a thorough evaluation.Screen Shot 2016-08-23 at 3.15.06 PM
  2. Tip 2, when importing a Work Environment, or portion of a W/E, you need to cancel the W/E search or it will just spin endlessly looking for W/E settings available anywhere on your computer or the network. When you click on Import… you will get a window that looks like this image below. This is usually where things start beach balling. If you hold the delete key for about 2 seconds it will cancel the search and allow you to browse for the Work Environment you need to import.Screen Shot 2016-08-23 at 3.16.38 PM

Tabs in AC20

You may have noticed that tabs are a little different in AC20, as some have mentioned. The intent is that they are supposed to be a little more intuitive, and certainly are more flexible once you get the hang of them. Here are the key differences in this feature:

Eye Dropper/Inject View Settings

You can now use the same “pick-up/inject” parameters system used between all elements placed in ARCHICAD, for the view settings between tabs. Injecting the new tab with new parameters does not affect the View Settings, but only changes the viewpoint settings (like the project map navigation).

Injecting view settings into a tab will make that tap a Viewpoint, rather than a view. In order to revert back to the original view settings you need to navigate back to the View Map origin.

Double Click/Single Click Tabs

Double clicking the tab will still revert it back to its view, where single clicking will maintain any the previous Viewpoint settings. Single and double clicking tabs is one feature of the tabs that has changed most significantly. The big improvement here is that each tab, wether opened from the Project Map (Viewpoint) or View Map (View), each tab is able to retain its original view settings. This means that if you open a floor plan from the view map, then switch to a new view (3d, elevation, section), that view is not dependent on the previous tabs view settings.

This also means that navigating between tabs by shortcut does not maintain the current tab’s settings. To match a plan to 3d tab if they are not from views with matching settings, use the eye dropper/inject between tabs.

Right Clicking Tabs

In AC19, there were very limited right click options when clicking on a tab. Now, depending on the tab’s source (Project/View Map), and content, you will get a range of options. If the tab is a Viewpoint, you can actually search for saved views using that Viewpoint by right clicking on the tab. You can also open tabs with current windows settings, right click to get to Pick Up / Inject, and more.

As in AC19, you can still right click an open tab to show it as a trace reference for the currently open tab. There are several other options added to the right click drop downs, such as “Match all to Current” and “Get Last Settings”.

This slideshow requires JavaScript.

One last minor feature of the tabs in 20 is the less alarming “!” symbol indicating that the View originally opened for that tab has changed and the tab is currently operating from a custom Viewpoint rather than a saved view setting.

Screen Shot 2016-08-23 at 3.00.36 PM

Work Environment Migration

I know we have covered this before, in various forms. But for anyone who has not been here for those, or needs a refresher, here is the “how to” on work environment migration. First, you should not bring in your work environment from a previous version of ARCHICAD. You can, but you will be missing quite a few new features and options critical to managing a quality BIM model.

So here is your step by step guide to setting up your work environment in ARCHICAD 20. Some of us are already using AC20, the rest should be migrated in a few short weeks (so bookmark this post for when you need it!).

Step 1: Bring in the WWA Standard W/E for 20

In ARCHICAD20 go to Options > Work Environment > Work Environment

Screen Shot 2016-07-22 at 10.26.15 AM

Fig 1.0 Work Environment Profiles

While on the Work Environment Profiles tab in the left column, click Import… on the right column (see Fig 1.0). Press and hold the delete key to cancel the Import Profile search (it will search your entire computer/network for available profiles).

Screen Shot 2016-07-22 at 10.26.19 AM.png

Fig. 2.0 Browse for Profiles

Click Browse… and go to the WW Server > 06 BIM Standards > 02 ArchiCAD Systems > 06 Work Environments > WWA20 and load that entire folder. Now back in the Work Environment Profiles tab (Fig 1.0), select the WWA Work Environment 20 from the profile options list, click Apply Schemes of Profile and Set as Default.

Step 2: Import and Apply Your Keyboard Shortcuts

Screen Shot 2016-07-22 at 10.26.09 AM

Fig. 3.0 Import Shortcut Profile


Now you can bring in your own keyboard shortcuts that you used in ARCHICAD19. In the left column of the Work Environment settings, click on Shortcut Schemes. Follow the steps from before, clicking on Import, Hold Delete, Browse for your shortcut scheme.

Lastly, go back to the Work Environment Profiles tab (Fig. 1.0, 3.0), select the applied work environment, and click Edit.

Screen Shot 2016-07-22 at 10.26.25 AM.png

Fig. 4.0 Apply Your Shortcuts to the Default Work Environment

In the Edit Profile manu, select the Short Cut Schemes line and apply your own short cuts to the work environment and click OK. Back in the Work Environment Settings, reapply the work environment to set your Keyboard Shortcuts as part of your default W/E.

Now that all that is applied, you should have all the palettes,dropdown menus and commands optimized for ARCHICAD20, which should look something like this:

Screen Shot 2016-07-22 at 9.57.28 AM

Fig. 5.0 WWA Work Environment 20


Don’t Forget the Teamwork Palette

If you don’t have the teamwork palette included in your work environment, you should. It is great to see who else is in the project, make reservations, release, reserve all, release all, send/receive… but one of the unsung features of the palette is the messaging and assigning feature. By simply clicking the “message” icon   Screen Shot 2016-02-26 at 1.54.29 PM.png  on the palette you can send a message to any team member:

Screen Shot 2016-02-26 at 10.57.20 AM

This message can include a screen capture view created directly from the above dialogue. The teamwork palette also allows you to assign elements to a team member for review. This has been very useful to me, when I needed to ask a question to a busy team member.

The last thing you can do with messages is assign a task. You can request a team member s/r, release all, leave the teamwork project, receive changes, etc. This is very helpful to avoid the “hey can you send and receive” comments or “can you release all”, that get thrown around regularly and disrupt other users.

This is certainly not the only way to communicate, but it is a lot less disruptive than continually asking questions on mundane or non-urgent details.

Teamwork (BIM Server) Etiquette

The WWA BIM manual has a list of teamwork and ARCHICAD best practices. I want to reiterate some of those hear and give a little explanation of why we need to be aware of these practices.

Screen Shot 2016-01-14 at 10.36.47 AM

  1. Send and Receive often; I recommend 2x per hour and whenever you leave your work station for any period of time:
    • This ensures BIM server backup files are created
    • More frequent S/R means quicker S/R times (less data synched at one time)
    • In the event we experience a teamwork or BIM Server errors less data will be lost upon file recovery
    • Other team members will be more up to date to the changes you have been working on, and can more easily coordinate their work with yours
  2. Release or release all occasionally:
    • Whenever you leave your computer for breaks and at the end of the day
    • Whenever you are finished with a specific task that required reserving large portions of the project
    • This prevents other users from constantly requesting portions of the project that they may need to work on
    • This prevents other users from kicking you out of the project because of your absence or unresponsiveness
  3. Do not reserve all unless you know you are the only one in the project; and release all when the task is done:
    • A reserve all is necessary for coordinating some attribute changes (delete and replace), and should be a coordinated effort for the entire team. Notify other team members that you will need to reserve all for x-amount of time, and perform the task as quickly and efficiently as possible so that other team members can get back to work as soon as possible.
  4. Leave the project at the end of the week (2x per month minimum):
    • The BIM server is reviewed for team members joined but inactive in the project for extended periods of time. These members are removed from the project to prevent file bloat.
    • Leaving the project keeps the list of users in the teamwork palette to a minimum- and clearly identifies who is actively working on the project
    • Leaving the project rebuilds your local data from the server next time you join
    • Leaving the project reduces unnecessary teamwork file bloat and keeps the file running smoothly and efficiently
  5. Incorporate the teamwork palette into your work environment:
    • The teamwork palette is more than just the s/r and release all buttons
    • The teamwork palette gives an indicator that you are in fact working online, so time is not wasted working in a file that has been disconnected from the server due to a teamwork or BIM server error
    • The teamwork palette is a great tool for messaging and assigning tasks to other team members as well as tracking requests and reservations made throughout the day
    • The teamwork palette as onscreen view options which allow you to quickly identify what you have reserved or elements that are reserved by others

Element Information Palette

Heres one that you may not be aware of, or if you are, possibly do not use. The Element Information Palette! Its a great tool to quickly look at the geometries, areas, volumes of selected elements. This palette has buttons to view a selected Element’s Properties, Size, Area on Plan, Height, Surface, and Volume.

Screen Shot 2015-08-21 at 12.54.59 PM  Screen Shot 2015-08-21 at 12.55.07 PM  Screen Shot 2015-08-21 at 12.55.10 PM  Screen Shot 2015-08-21 at 12.55.21 PM  Screen Shot 2015-08-21 at 12.55.28 PM
Recently this was very useful in checking an estimate of additional fill on a terrain mesh. I have also used it to check glazing to floor area percentages by comparing the wall surfaces with and without holes considered to get an approximate glazed opening to floor area (slab) ratio. The holes considered/not considered fields take into account holes in beams, openings in walls, skylights, openings in slabs, roofs and meshes as well as solid element operations. So depending on level of precision of the BIM model, it can be a fairly accurate estimating and verification tool.

Ultimately these are just design checks and not part of our documentation, so the Element Information Palette is a great tool for these non-permanent checks, rather than developing a full schedule or list to create a document from.

This palette is also very helpful for checking Element ID’s, by selecting all slabs, for example, you can verify that important slabs have an appropriate and unique ID. Or you can perform a quick check to verify you do not have 200 slabs with an element ID of “Kitchen Counter”.

Lastly, be aware that you can adjust the calculation units that appear in the Element Info Palette in the project preferences, and can even save or print the element information list. This palette in combination with the Element Selections Palette can be very useful tool for checking and rechecking areas, volumes and element ID’s.

Screen Shot 2015-08-21 at 12.55.43 PMScreen Shot 2015-08-21 at 12.58.24 PM I recommend having a shortcut set up for this palette, Com + I, so that it can easily be toggled on/off. Do not leave this palette up as a permanent fixture of your work environment, as it does slow AC down when a selection is made. It will attempt to recalculate all listable information with every new selection as long as the palette is open.

Undo Limits

Cntrl + Z, Cntrl + Z, CNTRL+Z!!!!!!!

This hasn’t really come up at WWA, but since so many designers are now working in AC19 & subsequently revisiting or rethinking their work environment, I thought I’d throw this out as food for thought.

You can set the undo limit in ARCHICAD in the work environment. It can be set to as high as 99 steps. At some point you have to ask yourself, is it faster to just redo? But in any case, you can make this adjustment to your work environment.

Screen Shot 2015-08-12 at 2.04.10 PM

I have been told that this may eat up some RAM, so if you are working on a laptop or old PC you may want to keep the limit low.

Work Environment & Teamwork Etiquette

The WWA BIM manual work environment section describes what is permitted to be customized and what should remain as an ARCHICAD Default. As a reference, your work environment settings should look something like this:

Work Environment CustomizationUser Preference Schemes, Company Standard Schemes, and Command Layout Schemes should be set to ARCHICAD defaults. Tool Schemes can be customized, but in most cases it is best to use the ARCHICAD default to avoid missing any new tools from software updates.


All of this is just to lead me into reenforcing our BIM manual general practices section on teamwork. This section states:

  • Release all before breaks & at the end of the day or whenever closing the project
  • When leaving a project send & receive then release all before leaving the teamwork project
  • Only remain joined in teamwork projects you are regularly actively working on. If information or model elements are being copied out of another project leave the teamwork project without sending/receiving once the copy/paste is done.
  • If prompted to save a PLN backup when doing a send and receive always save
  • Leave the teamwork project at the end of the week
  • Clean up local data for all projects and libraries every 30 days min. or when prompted

It is important to remember to release all as described in the BIM manual. This will prevent other users from needing to force you out of the project to access some elements you left reserved at the end of the day, which leads to local data and BIM server connection problems, and potentially lost work.


All this ties together in the Company Standard Schemes > Data Safety & Integrity portion of the work environment. The default work environment has a setting to release all when you close or leave the project.Work environment release all