There are several ways to use the navigator/organizer functions to produce a final set of documents. Some are easier to manage, some are better for maximizing flexibility. Some view map organizations have the advantage of being easy to set up and add to through the CD phase. Some navigator/view map management practices are just horrible for everything.
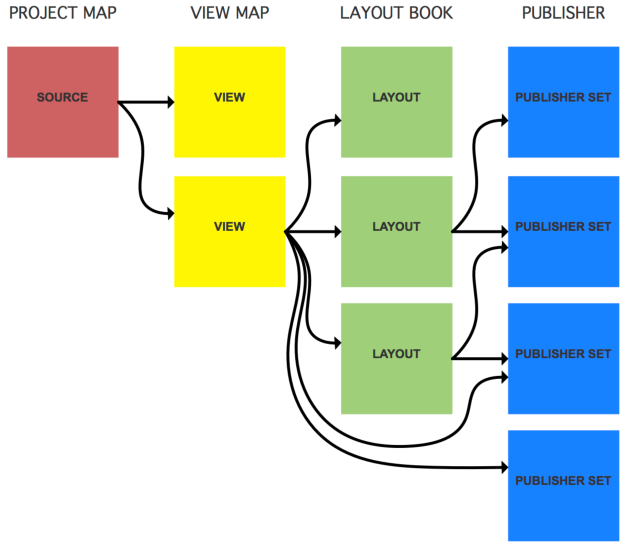
Here is a post with a great 10 minute video from Shoegnome explaining the Navigator vs. Organizer and what the pieces of the navigator (Project Map, View Map, Layout Book and Publisher) really are. One of the best parts of Jared’s post is the graphic explaining how one portion of the navigator relates to the next and really builds it up to more than its own parts.

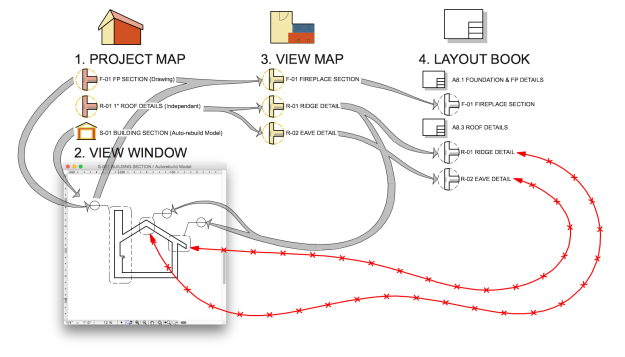
What this really means for detailing and the details structure is that a single source for details is possible, but that each unique detail should have its own source in the view map. There may be a Project Map item named 1″ Roof Details that has all standard roof details. Each detail on that window should then be saved into the view map with its own name and view settings, so that you will have 1″ Roof Details in the Project Map saved as Eave Detail, Ridge Detail, Barge Detail… each with unique view (Layer, Scale, MVO, Dimension Style, Zoom settings) in the View Map. The detail Views should then be placed to the appropriate layout.
This organization then has the advantage of quick, consistent, reliable and easy placement of linked markers. Linked markers should always link to the view map. If a marker links to a drawing on a layout the markers reference can potentially become severed if the drawing is moved to a new sheet. If the linked marker is linked to the first placed view of a view map item, that drawing can move anywhere, it can be cut and pasted, deleted and replaced, etc. and the linked marker will always re-reference the placed view.
 Its important to note this only applies to linked markers. Source markers always have their own unique relationship to the Project Map > View Map > Layout Book. If you are working on a project that already has a different View Map structure, or that already has its linked markers set to “The selected drawing” (layout item not view map item) special attention will need to be taken when setting up layouts or rearranging drawings and layouts. If a linked marker is linked to a layout drawing instead of a view map item, and the drawing is cut and pasted to relocate to a new sheet, it will loose the relationship to the drawing and appear as a yet to be placed drawing.

To move a drawing to a new layout from a project already set up incorrectly, use the organizer to move the the drawing. Drag the drawing from one sheet to the new sheet in the layout book portion of the navigator.
RECAP & SUMMARY:
I want to stress again, if your markers are linked to layout items, not copy (or cut) and paste to relocate drawings, your linked markers will loose their reference to the drawings. If you are just starting to set up and build your views, or just starting to layout markers, each view that will go onto a layout should have its own view map item, and all linked markers should reference The first drawing of the selected view.
There will be more to come on this topic, and possibly some new additions to our BIM Manual. For now, don’t hesitate to ask if this is in anyway unclear.
 As stated in the last post, this should be the practice, but if your project is already in the CD phase and has linked markers associated directly to layout drawings, do not attempt to redo the view map or layout book. Just be very diligent about reviewing all linked markers whenever a drawing is relocated, removed or moved to a new sheet.


